The Garlic Table:
Recipes for Every Craving

Explore Garlic Shop Recipes
Wholesome Recipes with
a Garlic Punch
Ingredients:
Flour, Garlic, Olive Oil, Rosemary, Salt, Sugar, Water, Yeast
Description:
Indulge in the aromatic embrace of this rustic Italian focaccia, generously studded with tender, sweet roasted garlic cloves and fragrant rosemary. It’s a delightful journey for your senses, offering a warm, garlicky hug perfect for sharing (or not!).
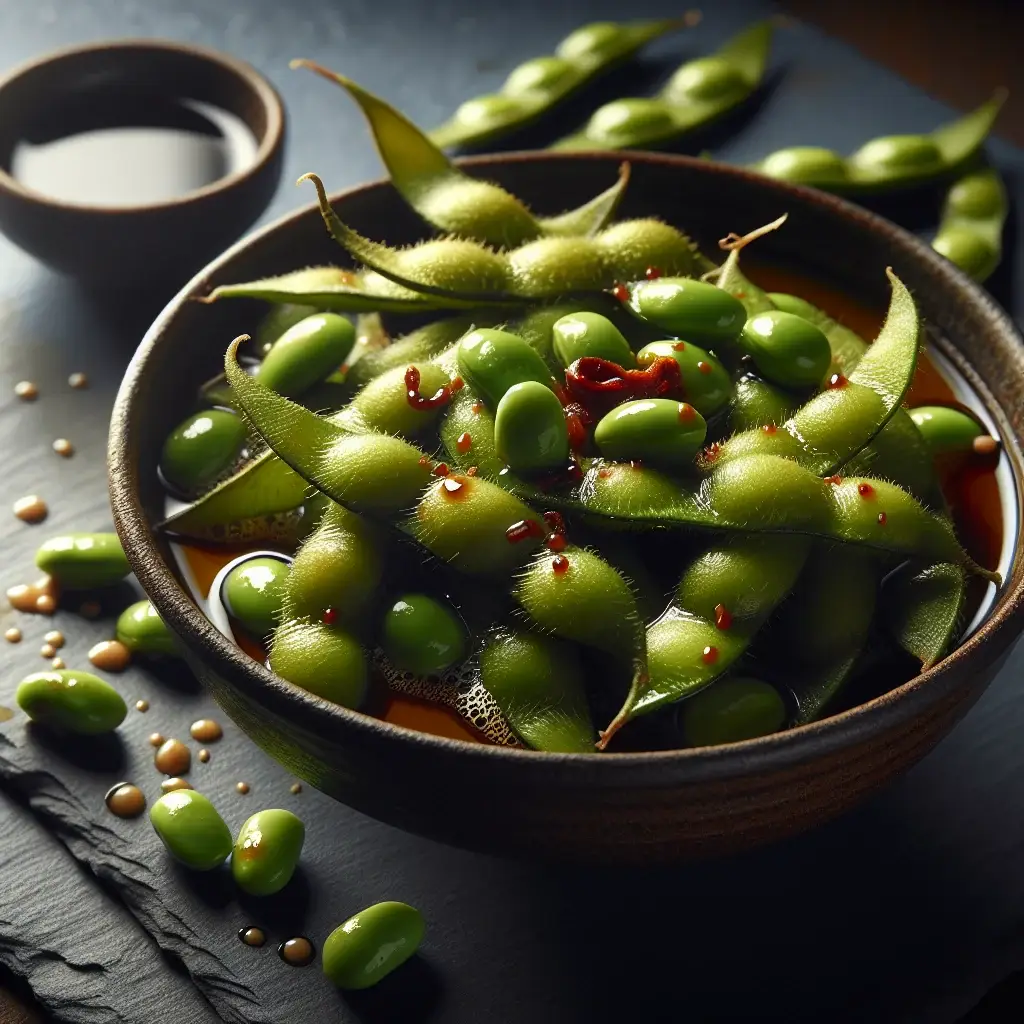
Garlicky Green Gems: Japanese Butter Soy Sauce Edamame
Ingredients:
Instructions:
1. Cook the Edamame
Bring a pot of lightly salted water to a boil. Add the frozen edamame and cook for about 3-5 minutes, or until tender-crisp. Drain well.
2. Prepare the Garlic Butter Sauce
In a large skillet or wok, melt the butter over medium heat. Add the minced garlic and red pepper flakes (if using) and sauté for about 30 seconds to 1 minute, until fragrant, being careful not to burn the garlic.
3. Combine and Season
Add the drained edamame to the skillet. Pour in the soy sauce and toasted sesame oil (if using). Toss well to coat the edamame evenly with the garlic butter sauce.
4. Serve
Cook for another 1-2 minutes, stirring occasionally, until the edamame is heated through and well-coated. Taste and add a pinch more salt if desired. Serve immediately.
Dive into a delectable world of garlicky goodness with this classic Japanese edamame appetizer. Perfectly infused with fragrant garlic, rich butter, and savory soy sauce, these vibrant green gems are a must-try for any garlic lover.
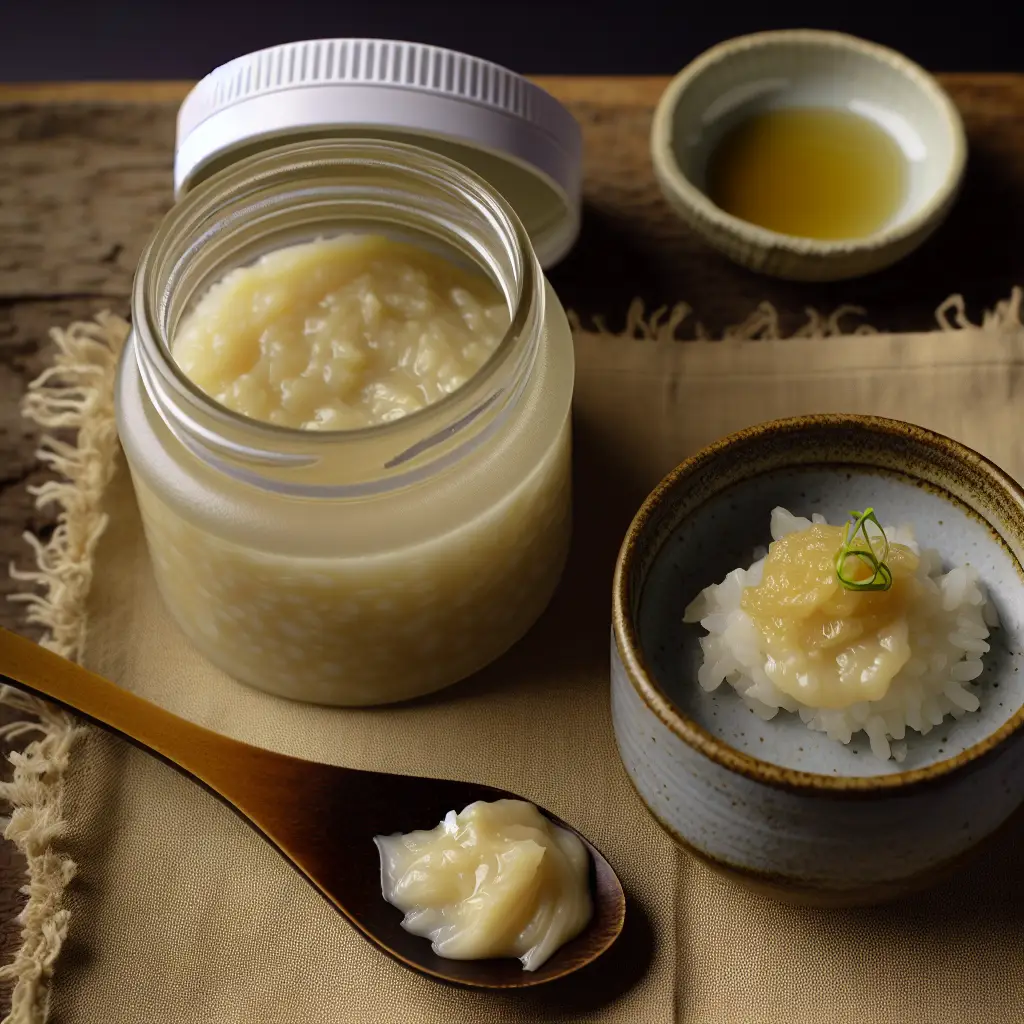
Umami Bomb: Japanese Fermented Garlic Shio Koji
Ingredients:
Instructions:
1. Prepare the Garlic
Peel all the garlic cloves. For easier blending, you can roughly chop larger cloves.
2. Rehydrate Koji (if using dried)
If your rice koji is dried, place it in a bowl and pour 50ml of the filtered water over it. Let it sit for about 15-20 minutes until softened and rehydrated.
3. Combine Ingredients
In a clean blender or food processor, combine the rehydrated koji (or fresh koji), peeled garlic cloves, sea salt, and the remaining 100ml of filtered water.
4. Blend Until Smooth
Blend the mixture until it forms a relatively smooth paste. It doesn’t need to be perfectly smooth; a slightly textured paste is fine.
5. Transfer to Jar
Transfer the garlic shio koji paste into a clean, sterilized glass jar. Don’t fill it completely; leave some headspace for fermentation.
6. Ferment
Loosely cover the jar with a lid (or use a breathable cloth with a rubber band to allow airflow while preventing contaminants). Place the jar at room temperature (ideally between 20-30°C / 68-86°F) out of direct sunlight.
7. Stir Daily
Stir the mixture once a day with a clean spoon. This helps prevent mold and ensures even fermentation.
8. Monitor Fermentation
The fermentation process can take anywhere from 7 days to 2 weeks, depending on the temperature. You’ll notice it becoming sweeter, more aromatic, and the garlic will soften considerably. The saltiness will also mellow out.
9. Storage
Once fermented to your liking (it should taste complex, savory, and less raw garlic-like), store the garlic shio koji in the refrigerator. It will last for several months.
Unleash a profound depth of garlicky umami with this traditional Japanese fermented garlic shio koji. A surprisingly simple yet incredibly versatile condiment, it elevates any dish with its complex, savory notes and tender, mellow garlic, making it a must-have for garlic enthusiasts.
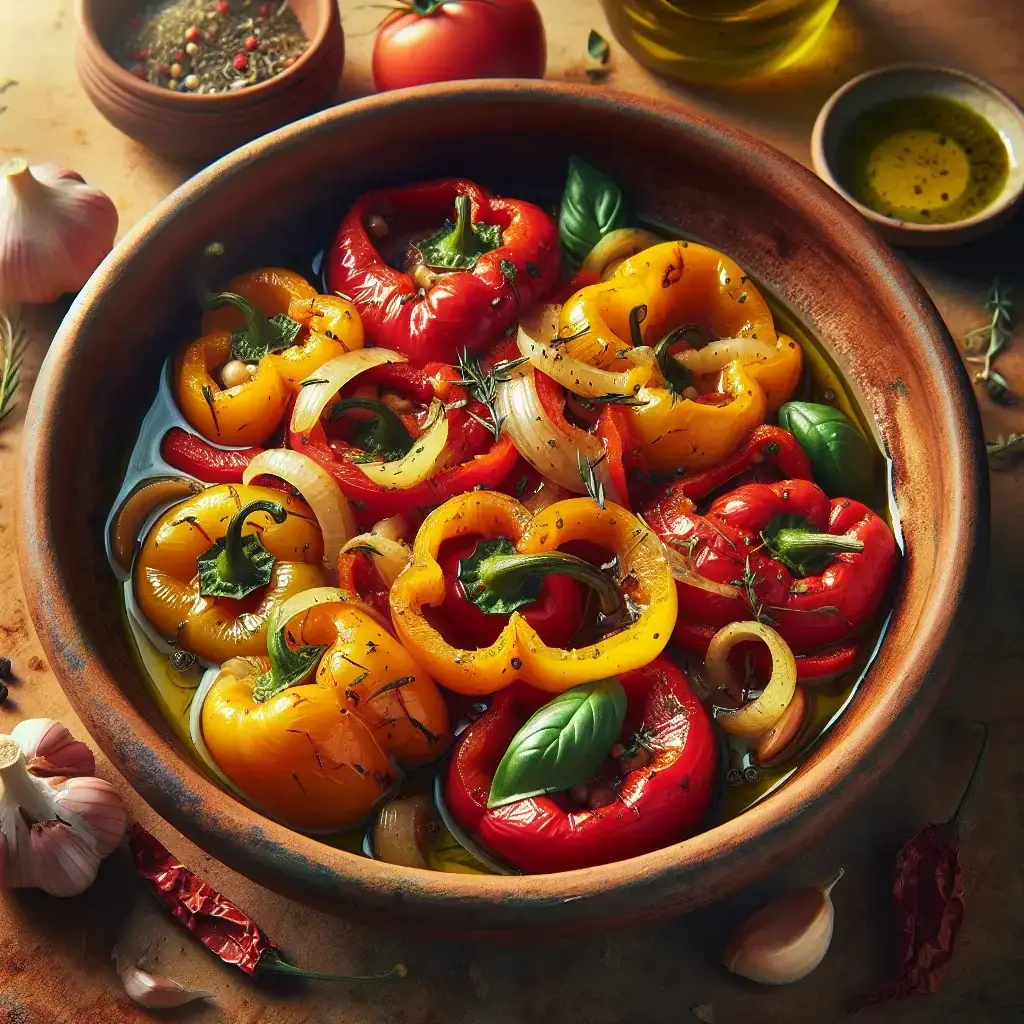
Puglian Garlic-Infused Peperonata
Ingredients:
Instructions:
1. Prepare the Vegetables
Wash and dry the bell peppers. Remove the core and seeds, then slice them into strips of about 1/2 inch thickness. Thinly slice the yellow onions and prepare the garlic by thinly slicing or mincing it.
2. Sauté the Aromatics
In a large, heavy-bottomed pot or Dutch oven, heat the olive oil over medium heat. Add the sliced onions and cook, stirring occasionally, until softened and translucent, about 8-10 minutes. Add the sliced or minced garlic and cook for another 2-3 minutes until fragrant, being careful not to let it brown too much to avoid bitterness.
3. Combine and Simmer
Add the sliced bell peppers to the pot. Stir well to coat the peppers with the oil and onion mixture. Cook for about 10-15 minutes, stirring occasionally, until the peppers start to soften slightly.
4. Add Tomatoes and Seasonings
Pour in the crushed tomatoes (or diced fresh tomatoes). Add the dried oregano, torn fresh basil leaves, salt, black pepper, and optional red pepper flakes. Stir everything together. Bring the mixture to a gentle simmer.
5. Slow Cook
Reduce the heat to low, cover the pot, and let the peperonata simmer for at least 45 minutes to 1 hour, or even longer (up to 1.5 hours), stirring occasionally. The longer it simmers, the more the flavors will meld and the vegetables will become tender. The sauce should thicken, and the oil should separate slightly, indicating it’s done.
6. Serve
Taste and adjust seasonings if necessary. Serve the Puglian Garlic-Infused Peperonata warm as a side dish, a topping for bruschetta, or alongside grilled meats or fish. It also tastes excellent at room temperature the next day.
Savor the sun-kissed flavors of Puglia with this deeply aromatic peperonata. Slow-cooked bell peppers, juicy tomatoes, and sweet onions are gloriously infused with abundant garlic, creating a side dish or main course that sings with Italian warmth and garlicky goodness.
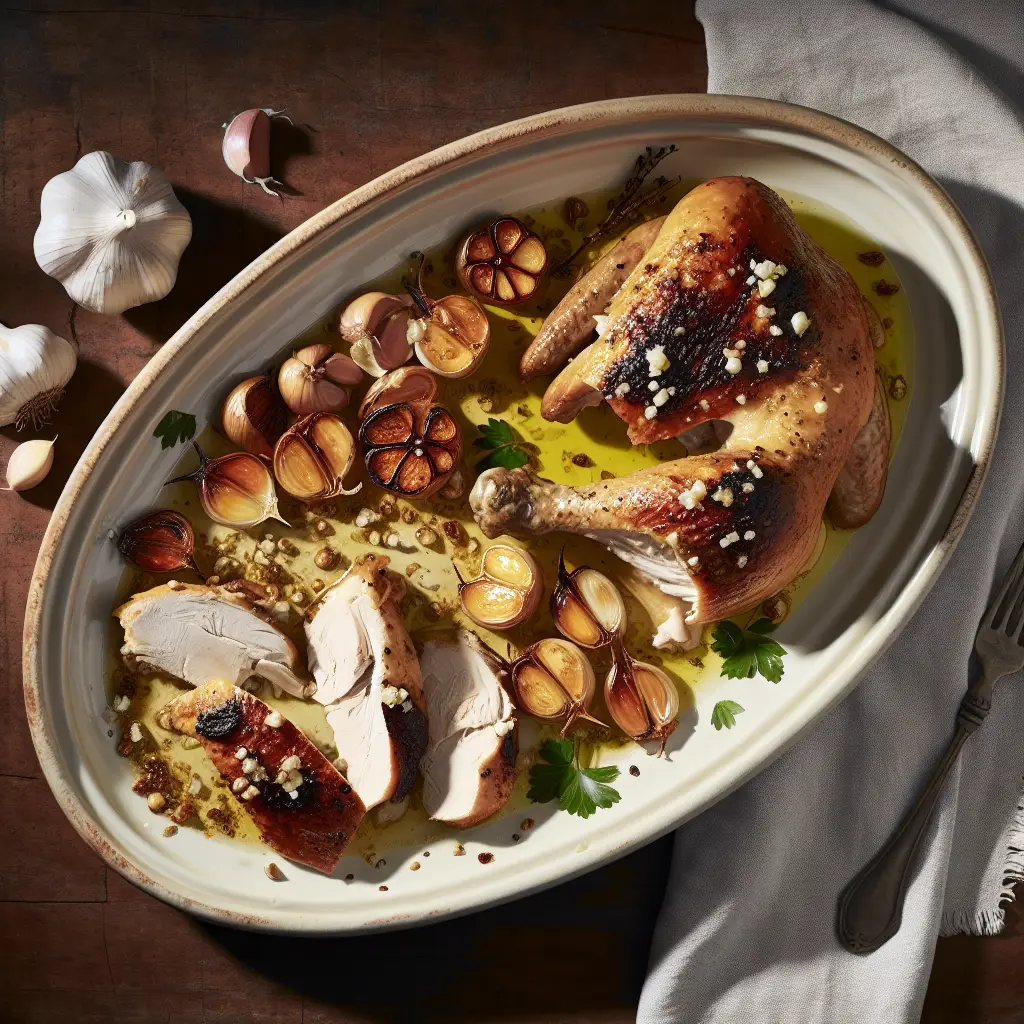
The Ultimate 40-Clove Garlic Chicken: Aromatic & Hearty
Ingredients:
Instructions:
1. Preheat Your Oven To 375
Preheat your oven to 375°F (190°C.)
2. Season Generously With Salt And Black Pepper
Pat the chicken pieces dry with paper towels. Season generously with salt and black pepper on all sides.
3. Heat The Olive Oil Over Medium-High Heat
In a large, oven-safe Dutch oven or heavy-bottomed pot, heat the olive oil over medium-high heat on the stovetop. Brown the chicken pieces in batches, skin-side down first, until golden brown and crispy, about 5-7 minutes per side. Remove chicken from the pot and set aside.
4. Heat To Medium
Reduce heat to medium. Add the unpeeled garlic cloves, rosemary, and thyme to the pot. Sauté for 2-3 minutes until fragrant, stirring occasionally. Be careful not to burn the garlic.
5. Pour In The White Wine And Chicken Broth
Pour in the white wine and chicken broth, scraping up any browned bits from the bottom of the pot with a wooden spoon. Bring to a simmer.
6. Return The Browned Chicken Pieces To The Pot
Return the browned chicken pieces to the pot, nestling them among the garlic cloves. Cover the Dutch oven tightly with its lid.
7. Transfer The Covered Pot To The Preheated Oven
Transfer the covered pot to the preheated oven and roast for 1 hour.
8. Remove The Lid And Continue To Roast For Another
After 1 hour, remove the lid and continue to roast for another 20-30 minutes, or until the chicken is cooked through (internal temperature of 165°F / 74°C at the thickest part of the thigh) and the sauce has thickened slightly. The garlic cloves should be very soft and easily squeezed from their skins.
9. Remove The Chicken And Garlic From The Pot
Carefully remove the chicken and garlic from the pot. If desired, skim any excess fat from the sauce. You can also mash some of the roasted garlic into the sauce for extra creaminess.
10. Garnished With Fresh Chopped Parsley
Serve the chicken hot, garnished with fresh chopped parsley, alongside the roasted garlic cloves. Encourage guests to squeeze the softened garlic onto their chicken or bread.
Dive into the aromatic world of a classic American comfort food! This 40-Clove Garlic Chicken recipe transforms humble ingredients into a succulent, garlic-infused masterpiece. Perfect for garlic lovers seeking a rich and comforting main course that's bursting with flavor from tender, roasted cloves. An unforgettable garlic experience awaits!
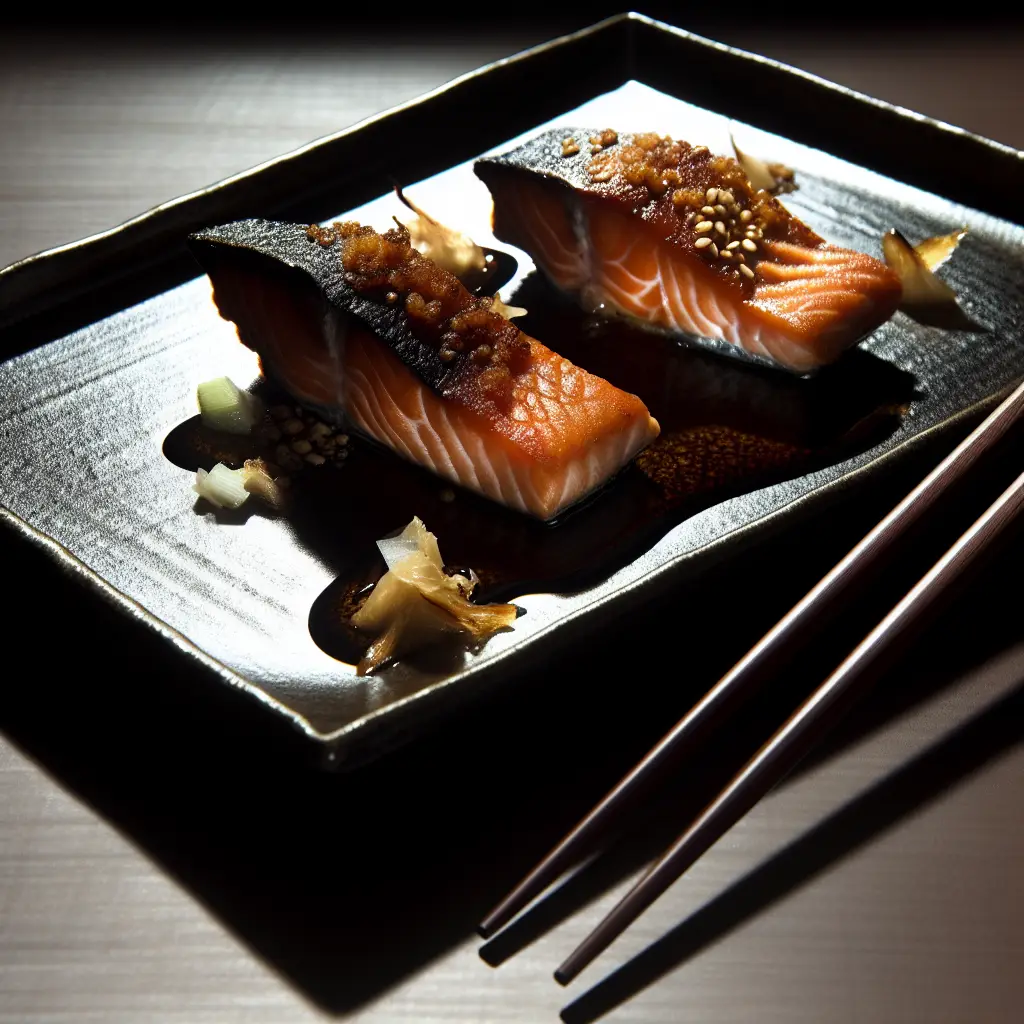
Garlic Soy Salmon with Crispy Skin
Ingredients:
Instructions:
1. Season Both Sides Lightly With Salt And Pepper
Pat the salmon fillets dry thoroughly with paper towels. Season both sides lightly with salt and pepper.
2. Whisk Together The Soy Sauce
In a small bowl, whisk together the soy sauce, mirin, sake, sugar, and grated ginger. Set aside.
3. Heat The Vegetable Oil In A Non-Stick Skillet
Heat the vegetable oil in a non-stick skillet over medium-high heat. Once hot, place the salmon fillets skin-side down in the skillet.
4. Ensure The Skin Makes Full Contact With The Pan
Cook for 4-5 minutes, pressing down gently on the fillets with a spatula to ensure the skin makes full contact with the pan and becomes crispy.
5. Cook For Another 2-3 Minutes
Flip the salmon carefully and cook for another 2-3 minutes, or until the fish is almost cooked through.
6. Add The Minced Garlic To The Pan
Add the minced garlic to the pan and cook for about 30 seconds until fragrant, being careful not to burn it.
7. Pour The Prepared Soy-Mirin Sauce Over The Salmon
Let it simmer for 1-2 minutes, spooning the sauce over the fillets until they are glazed and cooked through.
8. Remove From Heat
Remove from heat and serve immediately, garnished with sliced green onions or toasted sesame seeds if desired.
Dive into a delicious Japanese main course where flaky salmon meets a vibrant garlic-soy glaze. This simple yet flavorful dish celebrates the pungent power of garlic, creating an enticing aroma and taste that's sure to impress any garlic enthusiast.
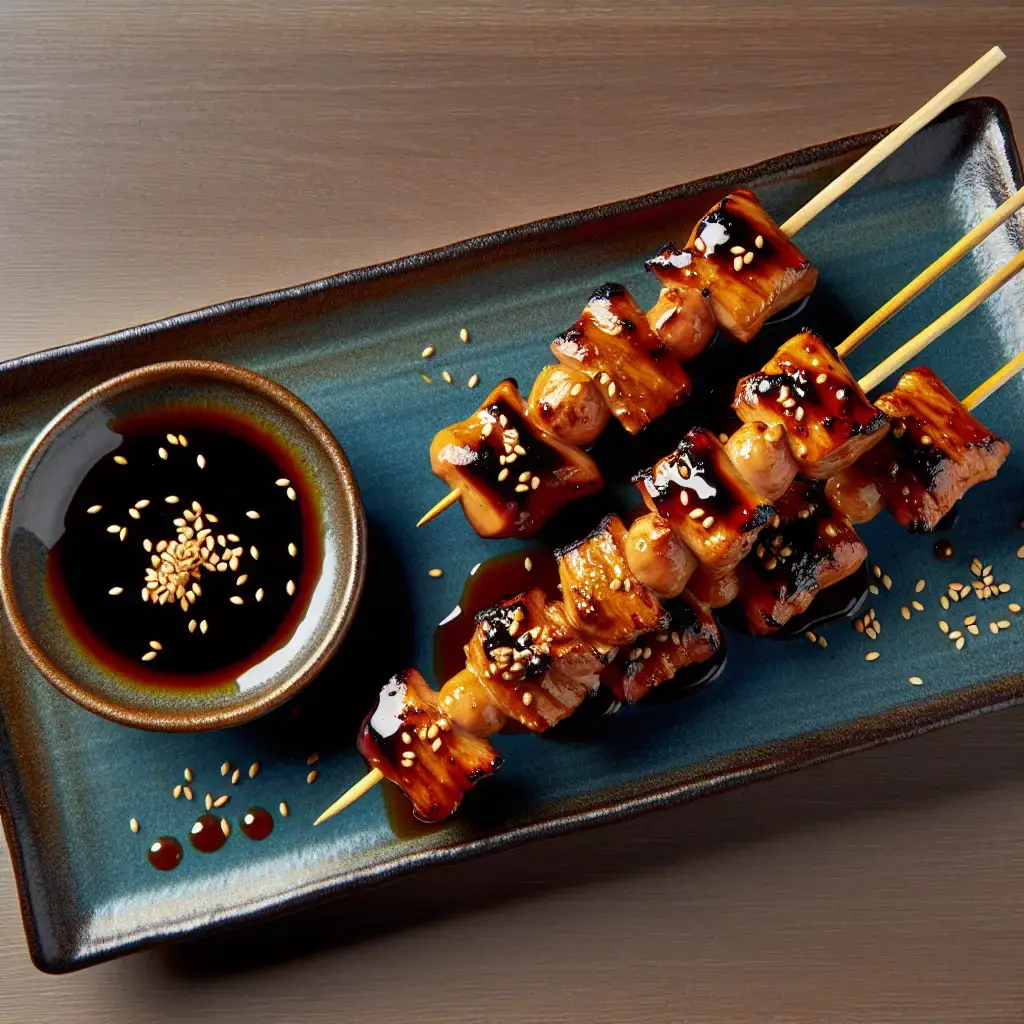
Garlic Teriyaki Chicken Skewers: A Taste of Japan
Ingredients:
Instructions:
1. Prepare the Marinade
In a medium bowl, whisk together the soy sauce, mirin, sake, sugar, minced garlic, and grated ginger until the sugar is dissolved.
2. Marinate the Chicken
Add the chicken cubes to the marinade, ensuring all pieces are well coated. Cover the bowl and refrigerate for at least 30 minutes, or ideally 2-4 hours for maximum flavor. If using wooden skewers, soak them in water for at least 30 minutes to prevent burning.
3. Prepare the Skewers
Thread the marinated chicken pieces onto the skewers. You can arrange them tightly or with a little space in between. Reserve the remaining marinade.
4. Thicken the Sauce (Optional)
If you prefer a thicker sauce, in a small bowl, dissolve the cornstarch in 2 tablespoons of the reserved marinade. Add this mixture back into the main reserved marinade and whisk well.
5. Grill the Skewers
Preheat your grill (or a grill pan) to medium-high heat. Lightly oil the grill grates to prevent sticking. Place the chicken skewers on the hot grill.
6. Cook and Baste
Grill for 4-6 minutes per side, turning occasionally, until the chicken is cooked through and has nice char marks. During the last few minutes of grilling, frequently baste the skewers with the reserved teriyaki marinade, allowing it to caramelize and create a glossy coating. Ensure the chicken reaches an internal temperature of 165°F (74°C.)
7. Serve
Remove the skewers from the grill and arrange them on a serving platter. Garnish generously with sesame seeds and thinly sliced green onions. Serve hot, perhaps with a side of steamed rice.
Dive into the savory world of Japanese cuisine with these tantalizing garlic teriyaki chicken skewers. A perfect blend of sweet, salty, and pungent garlic flavors, these skewers promise an unforgettable culinary experience that celebrates the mighty allium.