The Garlic Table:
Recipes for Every Craving

Explore Garlic Shop Recipes
Wholesome Recipes with
a Garlic Punch
Ingredients:
Butter, Garlic, Green Onion, Mirin, Soy Sauce, Sugar, Udon Noodles, Vegetable Oil
Description:
Dive into a delightfully simple yet profoundly flavorful Japanese dish! This Garlic Butter Udon is a quick and satisfying meal, perfectly showcasing the incredible versatility of garlic, with irresistible crispy garlic chips that add a fantastic texture and intense aroma. A true garlic lover's dream!

Tuscan White Beans with Sizzling Garlic and Sage
Ingredients:
Instructions:
1. Prepare the Beans
If using dried cannellini beans, soak them overnight and then cook until tender. If using canned beans, rinse them thoroughly under cold water and drain well.
2. Sauté Aromatics
In a large skillet or pot, heat the olive oil over medium-low heat. Add the thinly sliced garlic and fresh sage leaves. Cook gently for about 3-5 minutes, or until the garlic is golden and fragrant, and the sage leaves are crispy. Be careful not to burn the garlic.
3. Combine Ingredients
Add the rinsed and drained cannellini beans to the skillet. If using, stir in the diced tomatoes. Pour in the vegetable broth or water.
4. Simmer and Season
Bring the mixture to a gentle simmer. Cook for about 10-15 minutes, allowing the flavors to meld and the liquid to slightly reduce. Season generously with salt and freshly ground black pepper to taste. Adjust liquid consistency as desired; add a little more broth if it’s too dry, or simmer longer if too watery.
5. Serve
Ladle the hot Tuscan White Beans into bowls. Serve immediately with plenty of crusty bread to sop up the delicious garlicky sauce.
Dive into the rustic charm of Tuscany with these hearty white beans, infused with an irresistible garlic aroma and fresh sage, delivering pure comfort in every garlicky bite. A simple yet incredibly flavorful dish that captures the essence of Italian home cooking.

Tuscan Garlic Dream: Creamy Roasted Garlic & Chickpea Soup
Ingredients:
Instructions:
1. **Roast the Garlic
** Preheat your oven to 400°F (200°C). Cut off the very top of each garlic head, exposing the cloves. Drizzle with olive oil, season with salt and pepper, and wrap tightly in aluminum foil. Roast for 30-40 minutes, or until the cloves are soft and golden brown. Let cool slightly, then squeeze the roasted garlic cloves from their skins.
2. **Sauté the Aromatics
** In a large pot or Dutch oven, heat 2 tablespoons of olive oil over medium heat. Add the chopped onion, carrots, and celery. Sauté for 8-10 minutes, or until softened, stirring occasionally.
3. **Combine and Simmer
** Add the roasted garlic cloves, rinsed chickpeas, vegetable broth, and rosemary sprig to the pot. Bring to a boil, then reduce heat to low, cover, and simmer for 15-20 minutes to allow the flavors to meld.
4. **Blend to Perfection
** Remove the rosemary sprig. Using an immersion blender, blend the soup until smooth and creamy. Alternatively, carefully transfer the soup in batches to a regular blender and blend until smooth.
5. **Finish and Serve
** Stir in the heavy cream. Season with additional salt and pepper to taste. Heat gently for a few more minutes, ensuring it doesn't boil. Serve hot, garnished with grated Parmesan cheese (if using) and fresh parsley. A side of crusty bread is essential for dipping!
Indulge in a heartwarming Italian classic, reimagined! This creamy garlic and chickpea soup, infused with the rich aroma of roasted garlic, is pure comfort in a bowl. A delightful exploration of rustic Tuscan flavors, perfect for chilly evenings and garlic lovers.

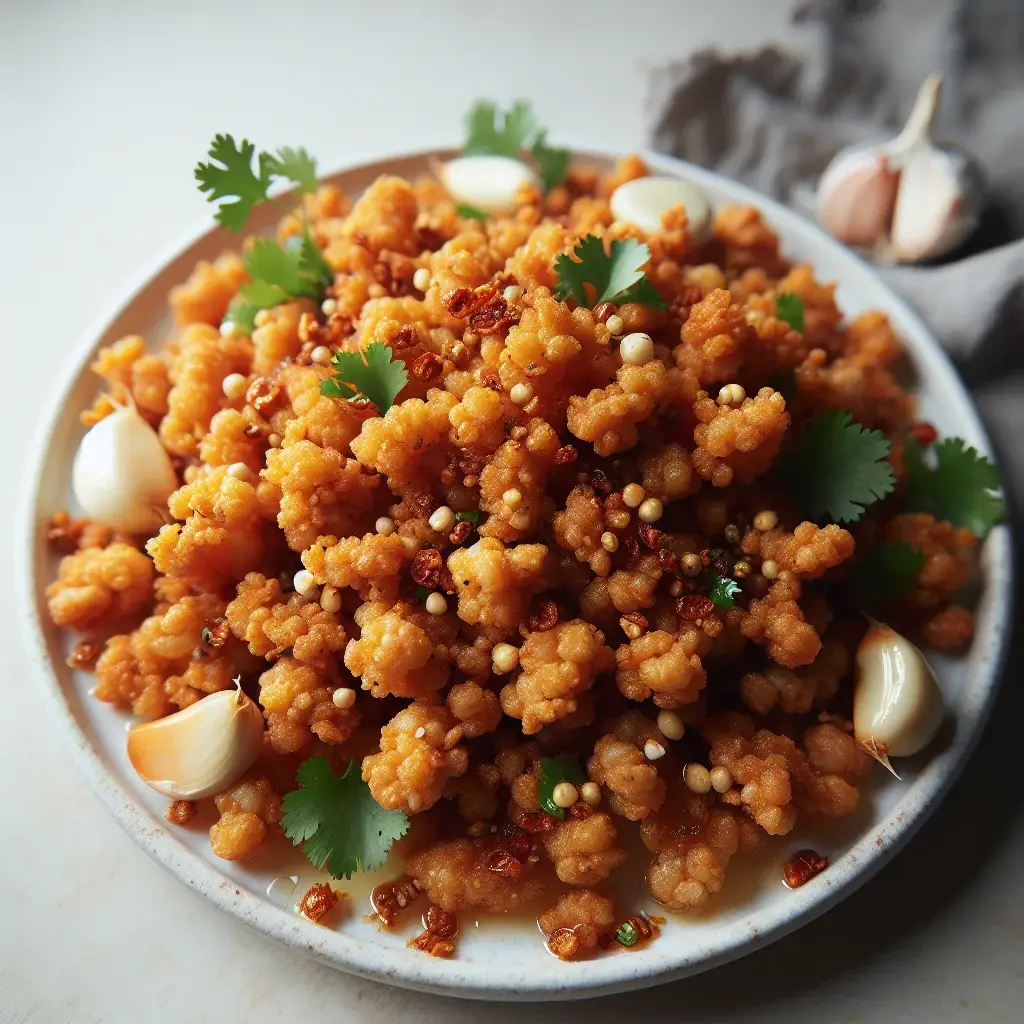
Garlic Gold: Crispy Indian Sev Snack
Ingredients:
Instructions:
1. Combine The Gram Flour
In a large mixing bowl, combine the gram flour, rice flour, red chili powder, turmeric powder, asafoetida, crushed carom seeds, and salt. Mix well.
2. Add The Minced Garlic
Add the minced garlic (or garlic paste) to the dry ingredients. Gradually add water, a little at a time, and knead to form a smooth, stiff dough. The dough should be pliable but not sticky. Cover the dough and let it rest for 10-15 minutes.
3. Heat Oil For Deep Frying In A Heavy-Bottomed Pan
Heat oil for deep frying in a heavy-bottomed pan or kadai over medium heat. To check if the oil is hot enough, drop a small piece of dough into it; it should sizzle and immediately come to the surface.
4. Grease A Sev Maker
Grease a sev maker (chakli press) with a little oil. Fill the sev maker with a portion of the dough.
5. Press The Sev Maker Directly Over The Hot Oil
Press the sev maker directly over the hot oil, moving it in a circular motion to create strands of sev. Do not overcrowd the pan.
6. Brown And Crispy
Fry the sev until it turns golden brown and crispy, flipping once. This usually takes about 2-3 minutes per batch.
7. Remove The Fried Sev And Drain Excess Oil
Using a slotted spoon, remove the fried sev and drain excess oil on absorbent paper or a wire rack.
8. Repeat The Process With The Remaining Dough
Repeat the process with the remaining dough.
9. Break The Sev Into Smaller Pieces And Store
Once cooled completely, break the sev into smaller pieces and store in an airtight container.
Dive into the crunchy, garlicky goodness of this traditional Indian snack! Perfect for satisfying those savory cravings, this crispy sev is packed with robust garlic flavor, making it an irresistible treat that will have you reaching for more. A truly addictive garlic experience!

Fiery Garlic Shrimp with Tamarind Zing
Ingredients:
Instructions:
1. Prepare the Shrimp
Pat the peeled and deveined shrimp dry with paper towels. Season lightly with a pinch of salt and pepper.
2. Prepare the Sauce
In a small bowl, whisk together the fish sauce, tamarind paste (or diluted concentrate), sugar, black pepper, red chili flakes, and 2 tablespoons of water until the sugar dissolves. Set aside.
3. Sauté Aromatics
Heat the oil in a large skillet or wok over medium-high heat. Add the minced garlic and sliced shallot and sauté for 1-2 minutes until fragrant and lightly golden. Be careful not to burn the garlic.
4. Cook the Shrimp
Add the shrimp to the skillet in a single layer. Cook for about 1-2 minutes per side, until they just start to turn pink. Do not overcrowd the pan; cook in batches if necessary.
5. Combine with Sauce
Pour the prepared tamarind sauce over the shrimp. Toss quickly to coat the shrimp evenly. Continue to cook for another 1-2 minutes, stirring occasionally, until the sauce thickens slightly and coats the shrimp, and the shrimp are opaque and cooked through. Avoid overcooking the shrimp, as they can become tough.
6. Serve
Remove from heat. Garnish generously with fresh chopped cilantro. Serve immediately with hot jasmine rice.
Embark on a flavor adventure with these vibrant Vietnamese garlic shrimp! The succulent shrimp are bathed in a sweet, savory, and powerfully garlicky sauce, perfectly balanced with a tangy tamarind kick. It's a quick and easy main course that’s sure to ignite your taste buds and garlic obsession.
Moo Tod Kratiem Prik Thai: Crispy Thai Garlic and Garlic & Pepper Pork
Ingredients:
Comfort Food, Fried, Main Course, Pork, Savory, Spicy, Thai
Instructions:
1. Prepare the Garlic and Pepper Paste
In a mortar and pestle, pound the white peppercorns until coarsely crushed. Add the peeled garlic cloves and pound until a coarse paste forms. Alternatively, you can finely mince the garlic and crush the peppercorns, then combine them.
2. Marinate the Pork
In a medium bowl, combine the minced pork with the prepared garlic and pepper paste. Add the fish sauce, oyster sauce, and granulated sugar. Mix everything thoroughly with your hands until well combined. For best results, let it marinate for at least 15-30 minutes at room temperature, or up to 1 hour in the refrigerator.
3. Prepare for Frying
Heat the vegetable oil in a deep frying pan or wok over medium-high heat. The oil should be hot enough (around 350-375°F / 175-190°C) to sizzle when a small piece of pork is added. Test a small piece first to ensure the oil is at the right temperature.
4. Fry the Pork
Carefully add the marinated pork in small batches to the hot oil. Avoid overcrowding the pan, as this will lower the oil temperature and result in greasy pork. Fry until the pork is golden brown and crispy, about 3-5 minutes per batch, stirring occasionally to ensure even cooking. The garlic will also turn crispy and fragrant.
5. Drain and Serve
Using a slotted spoon or spider, remove the fried pork and crispy garlic pieces from the oil and transfer them to a plate lined with paper towels to drain excess oil. Serve hot, garnished with fresh coriander. This dish pairs wonderfully with steamed jasmine rice and a side of Sriracha or sweet chili sauce.
Indulge in the irresistible crunch and aromatic punch of this classic Thai garlic-infused fried pork. It's a quick and incredibly flavorful main course, perfect for garlic enthusiasts looking for an authentic and satisfying taste of Thailand.

Tuscan Sun-Kissed Garlic Broth with Poached Egg
Ingredients:
Instructions:
1. Prepare the Aromatics
In a large, heavy-bottomed pot or Dutch oven, heat the olive oil over medium heat. Add the chopped onion, carrots, and celery. Sauté for about 8-10 minutes, or until the vegetables have softened.
2. Add the Garlic and Tomatoes
Add the thinly sliced garlic to the pot and cook for another 2-3 minutes until fragrant, being careful not to brown it. Stir in the crushed tomatoes, salt, and pepper. Let it simmer for 5 minutes, allowing the flavors to meld.
3. Simmer the Soup
Pour in the vegetable broth. Bring the soup to a gentle boil, then reduce the heat to low, cover, and let it simmer for at least 20-25 minutes, or until all the vegetables are tender and the flavors have fully developed.
4. Prepare the Bread and Herbs
While the soup simmers, tear the stale rustic bread into bite-sized pieces or toast fresh bread until slightly crisp. Stir the fresh basil and mint into the soup just before serving.
5. Poach the Eggs (Optional)
Gently crack each egg directly into the simmering soup, spacing them out. Cook for 3-5 minutes, or until the whites are set and the yolks are still runny. Alternatively, poach the eggs separately in a pot of simmering water and add them to the soup bowls.
6. Assemble and Serve
Place a portion of the bread in the bottom of each serving bowl. Ladle the hot soup over the bread. Carefully place a poached egg on top of each serving. Drizzle with extra virgin olive oil and generously sprinkle with grated Parmesan cheese. Serve immediately.
A rustic and comforting Italian soup from the Maremma region of Tuscany, packed with fresh vegetables, robust garlic flavor, and topped with a perfectly poached egg. It's a heartwarming meal that celebrates simple, wholesome ingredients and the delightful punch of garlic.