The Garlic Table:
Recipes for Every Craving

Explore Garlic Shop Recipes
Wholesome Recipes with
a Garlic Punch
Ingredients:
All-Purpose Flour, Baking Powder, Baking Soda, Buttermilk, Cheddar Cheese, Dried Parsley, Garlic Powder, Salt, Sugar, Unsalted Butter
Description:
Indulge in the ultimate American comfort food with these Cheesy Garlic Drop Biscuits. Inspired by the famous biscuits from Red Lobster, this recipe delivers incredibly tender, flaky biscuits bursting with sharp cheddar and a savory garlic kick. Topped with a lavish brushing of garlic butter, they are a guaranteed crowd-pleaser and the perfect garlicky companion to any meal.
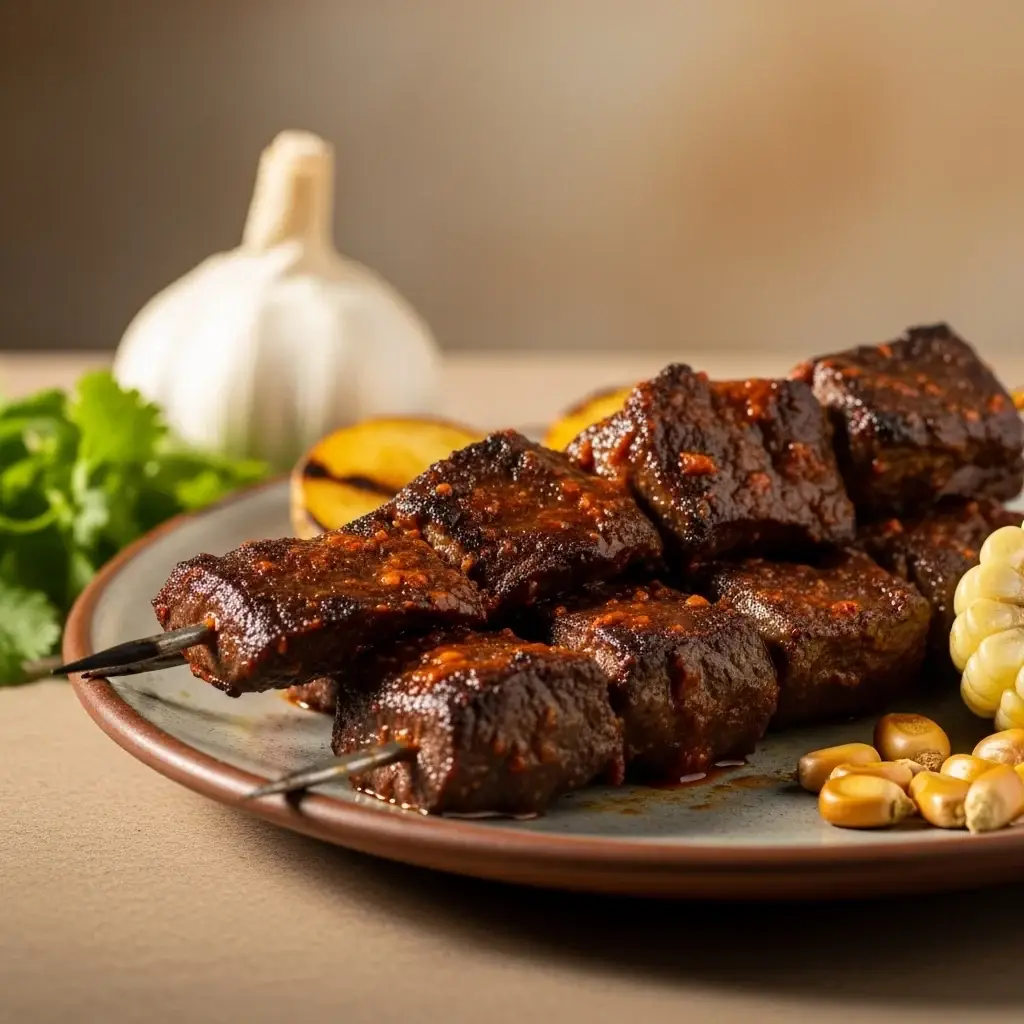
From the Streets of Lima: Sizzling Peruvian Garlic & Chile Beef Heart Skewers (Anticuchos de Corazón)
Ingredients:
Instructions:
1. Prepare the Heart
Carefully trim the beef heart, removing any tough sinew, silver skin, and excess fat. Cut the cleaned meat into uniform cubes, approximately 1 to 1.5 inches in size.
2. Make the Garlic Marinade
In a large, non-reactive bowl, whisk together the ají panca paste, red wine vinegar, minced garlic, cumin, oregano, vegetable oil, pepper, and salt until you have a smooth, homogenous marinade.
3. Marinate the Meat
Add the beef heart cubes to the marinade, ensuring every piece is thoroughly coated. Cover the bowl and let it marinate in the refrigerator for at least 3-4 hours, or preferably overnight for the deepest flavor.
4. Skewer the Meat
Once marinated, thread 3 to 4 cubes of the beef heart onto each skewer. Reserve the leftover marinade for basting.
5. Grill the Anticuchos
Preheat your grill to a medium-high heat. Place the skewers on the hot grill. Cook for about 3-4 minutes per side, turning occasionally. As they cook, brush them with the reserved marinade to keep them moist and add another layer of flavor. The anticuchos are done when they are nicely charred on the outside but still tender inside.
6. Serve
Serve the anticuchos hot, straight from the grill. They are traditionally accompanied by grilled potato slices and a piece of Peruvian corn. Offer a spicy chili sauce on the side for dipping.
A smoky, spicy, and garlicky bite of Peru's most beloved street food.
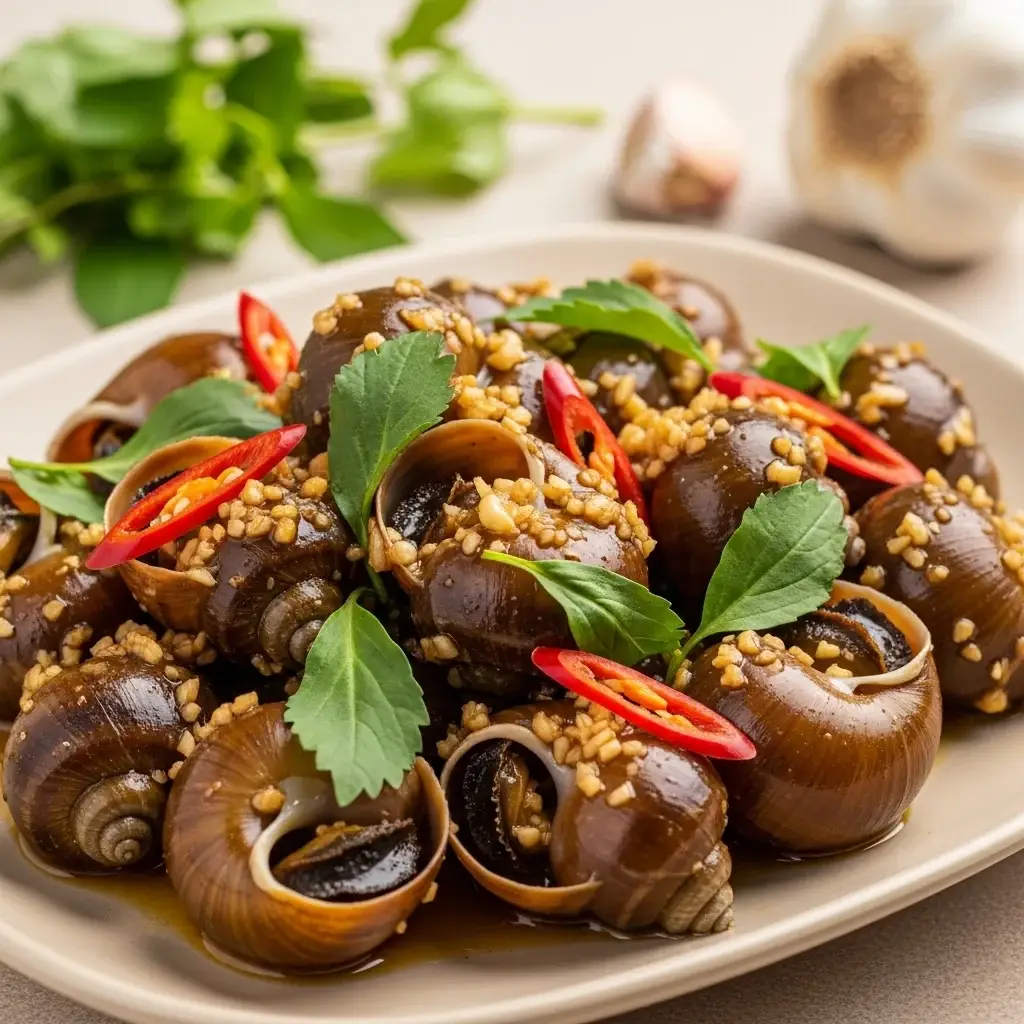
A Taste of Vietnam’s Coast: Fragrant Garlic Butter Snails (Ốc Hương Xào Bơ Tỏi)
Ingredients:
Instructions:
1. Clean the Snails
Begin by thoroughly cleaning the snails. Soak them for at least an hour in water mixed with a bit of rice water, vinegar, or a few chopped chilies to help them release any grit. Scrub the shells and rinse them multiple times under cold running water until the water runs clear.
2. Boil the Snails
Place the cleaned snails in a pot with the lemongrass stalks and enough water to cover them. Bring to a boil and cook for about 3-5 minutes. Drain the snails and discard the lemongrass and water. This initial boil helps to cook the snails and infuse them with the aroma of lemongrass.
3. Sauté the Aromatics
In a large pan or wok, melt the butter over medium heat. Add the minced garlic and sauté until fragrant and lightly golden, being careful not to let it burn.
4. Stir-fry the Snails
Add the boiled snails to the pan with the garlic butter. Stir-fry for a minute to coat the snails evenly.
5. Season and Simmer
Add the oyster sauce, sugar, and bouillon powder to the pan. Stir everything together. Cook for another 5-7 minutes, stirring frequently, until the sauce has thickened slightly and clings to each snail.
6. Serve
Transfer the garlic butter snails to a platter. Garnish with fresh Vietnamese coriander and sliced chilies. Serve immediately with crusty bread to soak up all of the delicious, garlicky butter sauce.
This popular Vietnamese street food classic is a must-try for adventurous foodies and garlic lovers alike. Sweet, chewy Babylonia snails are stir-fried in a rich, fragrant sauce of butter, garlic, and lemongrass for an unforgettable taste experience.

From the Shores of Chiclayo: A Savory Skate & Garlic Omelette (Tortilla de Raya)
Ingredients:
Instructions:
1. Prepare the Skate
After soaking the dried skate overnight, drain the water. Place the skate in a pot with fresh water and bring to a boil. Cook for about 20 minutes until tender. Once cooked, let it cool and then shred the meat with your fingers, discarding any cartilage.
2. Mix the Omelette Batter
In a large bowl, beat the eggs well. Stir in the chopped red onion, green onion, minced garlic, ají panca paste, and black pepper. If using, whisk in the flour until no lumps remain. Gently fold in the shredded skate meat until everything is well combined. Be cautious with adding salt, as the rehydrated skate will still be salty.
3. Cook the Omelette
Heat a generous amount of vegetable oil in a large, non-stick skillet over medium-low heat. Pour the entire egg and skate mixture into the pan and spread it out evenly. Cook for about 4-5 minutes per side, until golden brown and cooked through. To flip, you can slide it onto a large plate and then invert it back into the skillet.
4. Make the Salsa Criolla
While the omelette is cooking, combine the julienned red onion, ají amarillo, lime juice, and chopped cilantro in a small bowl. Season with a pinch of salt and toss to combine.
5. Serve
Once cooked, slide the Tortilla de Raya onto a serving platter. Cut it into wedges and serve immediately, generously topped with the fresh Salsa Criolla. It is traditionally accompanied by fried yuca or sweet potato.
Discover a taste of Northern Peru with this Tortilla de Raya, a traditional dish straight from the coastal city of Chiclayo. This isn't your average breakfast; it's a hearty and flavorful omelette featuring dried skate fish, a generous amount of garlic, and a kick of Peruvian chili. It's a simple, protein-packed meal that showcases the rustic and delicious soul of Peruvian home cooking, with garlic playing a key role in its signature taste.
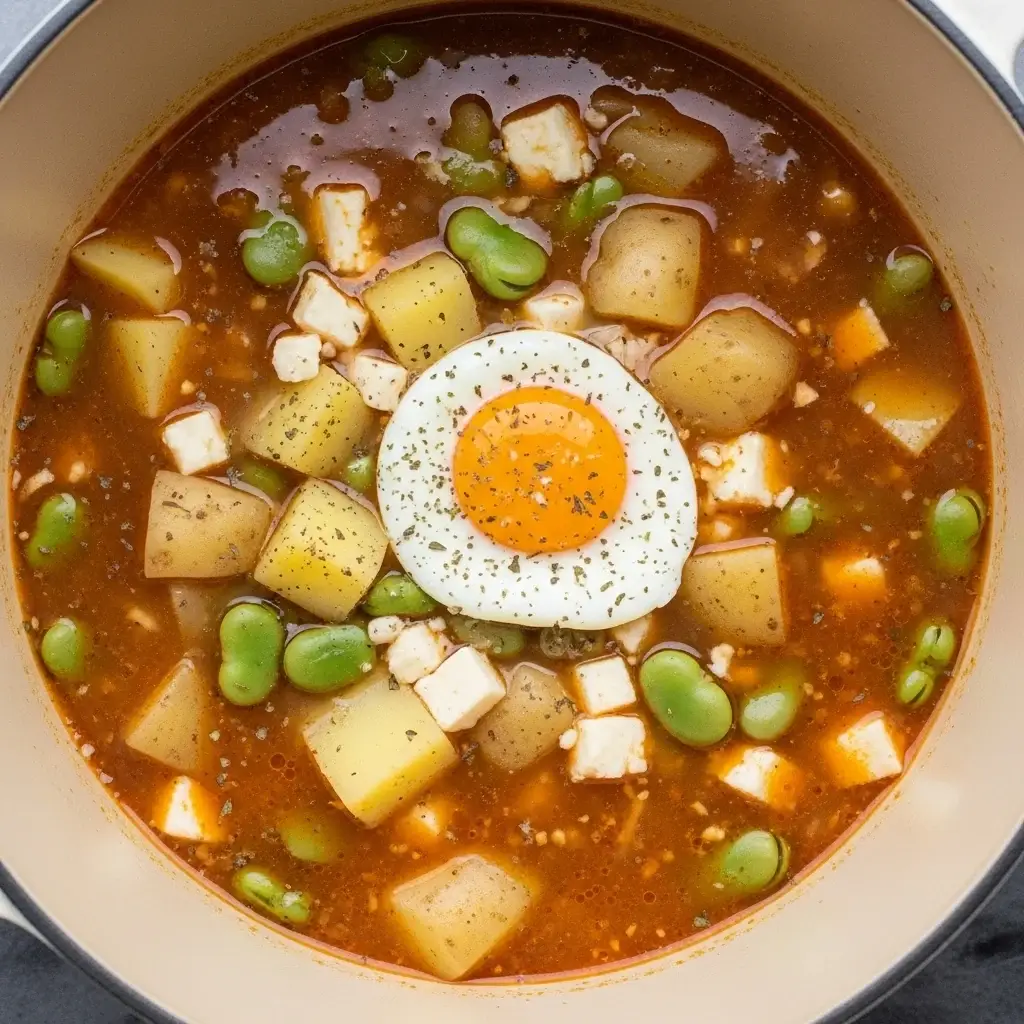
An Andean Hug in a Bowl: Peru’s Comforting Garlic & Egg Chowder (Chupe de Huevo)
Ingredients:
Instructions:
1. Sauté the Aromatics
Heat the oil in a large pot or Dutch oven over medium heat. Add the chopped onion and cook until soft and translucent, about 5-7 minutes. Add the minced garlic, aji panca paste, aji amarillo paste, dried oregano, and cumin. Cook for another 2-3 minutes, stirring constantly, until fragrant.
2. Simmer the Soup
Add the diced potatoes and the vegetable broth or water to the pot. Bring to a boil, then reduce the heat to a simmer. Cook for 15-20 minutes, or until the potatoes are tender.
3. Add the Finishings
Stir in the fava beans and queso fresco, allowing the cheese to melt slightly into the soup. Reduce the heat to low and pour in the evaporated milk, stirring gently to combine. Be careful not to let the soup boil after adding the milk. Season with salt and pepper to your liking.
4. Poach the Eggs
Carefully crack the eggs one by one directly into the simmering soup, spacing them apart. Let them poach gently for 3-5 minutes, or until the whites are set but the yolks are still runny.
5. Serve
Just before serving, stir in the fresh huacatay. To serve, carefully ladle one poached egg and a generous portion of the soup into each bowl. Serve immediately, with crusty bread for dipping if desired.
A delicious, hearty soup from the Peruvian Andes, perfect for garlic lovers. This comforting one-pot wonder features a flavorful base of garlic and Peruvian chiles, enriched with potato, milk, and cheese, and crowned with a perfectly poached egg.

Explosively Good: American Cheesy Garlic Bombs
Ingredients:
Instructions:
1. Preheat Your Oven To 400
Preheat your oven to 400°F (200°C) and line a baking sheet with parchment paper.
2. Separate The Biscuits And Flatten Each One Slightly
Separate the biscuits and flatten each one slightly.
3. Place A Cube Of Mozzarella Cheese In The Center
Place a cube of mozzarella cheese in the center of each biscuit.
4. Wrap The Dough Around The Cheese
Wrap the dough around the cheese, pinching the seams together tightly to form a ball.
5. Place The Dough Balls Seam-Side Down On The Prepared
Place the dough balls seam-side down on the prepared baking sheet.
6. Mix Together The Melted Butter
In a small bowl, mix together the melted butter, minced garlic, and parsley.
7. Brush This Garlic Butter Mixture Over The Cheese Bombs
Brush this garlic butter mixture over the cheese bombs and then sprinkle with Parmesan cheese.
8. Brown And The Dough Is Cooked Through
Bake for 10-15 minutes, or until the tops are golden brown and the dough is cooked through.
9. Cool For A Few Minutes Before Serving Warm
Let them cool for a few minutes before serving warm, optionally with a side of marinara sauce for dipping.
The ultimate party snack is here! These American Cheesy Garlic Bombs are outrageously delicious, easy-to-make pull-apart bites of biscuit dough stuffed with gooey mozzarella, then drenched in garlic butter. Perfect for sharing, but you won't want to.

A Refreshing Bite from the Caucasus: Georgian Kidney Bean & Garlic Salad (Lobio)
Ingredients:
Bean, Garlic, Georgian, Gluten-Free, Healthy, No-Cook, Rustic, Salad, Starter, Vegan, Vegetarian, Walnut
Instructions:
1. Prepare the Salad Base
In a medium-sized bowl, combine the rinsed and drained kidney beans, the finely diced red onion, minced garlic, chopped walnuts, and fresh cilantro. If you're using it, add the minced jalapeño.
2. Make the Dressing
In a separate small bowl or jar, whisk together the red wine vinegar, olive oil, salt, and pepper until well combined.
3. Combine and Chill
Pour the dressing over the bean mixture and stir gently until everything is evenly coated. For the best flavor, cover the bowl and let the salad sit in the refrigerator for at least 30-60 minutes to allow the flavors to meld together.
4. Serve
Before serving, taste and adjust the seasoning with more salt, pepper, or vinegar if needed. You can serve it chilled or at room temperature, garnished with a few extra walnuts and a sprinkle of fresh cilantro.
Discover a refreshing and protein-packed Georgian classic perfect for any season. This simple Lobio salad combines hearty kidney beans with the crunch of walnuts, the freshness of cilantro, and a zesty, garlicky dressing. A versatile and healthy dish that brings the unique flavors of the Caucasus to your table, it's a garlic lover's dream side or light meal.